


After enabling Enabling External Authentication and Configuration of SAML 2 Single sign on plugin users will not be able to login to the ServiceNow instance by usual login URL(https://demo.service-now.com). Single sign on settings prevent users from logging into ServiceNow instance instance directly without ADFS login.
Checking Enabling External Authentication Status:

Workaround:
Instead of using general login URL(https://demo.service-now.com), Administrators can use the following URL to bypass external authentication and log in with a local ServiceNow user
URL: http://.service-now.com/side_door.do

ADFS Relying Party Configuration:
Now we take the Service-Now Metadata and import it into your ADFS server. However, manual configuration of the Relying partner appears to be easier to implement
1. Open the ADFS 2.0 Management console and select “Relying Party Trusts"
2. Select “add Relaying party Trust” from the top right corner of the window. The add wizard will appear. Click on “Start” to begin
3. Select “Enter data about the relying party manually” and select “Next >”
4. Give it a display name such as “anyname” and enter any notes you wish finished by selecting “Next >”.
5. Select AD FS 2.0 Profile and click “Next >”.
6. Do not select anything and click "Next>"
7. Do not enable any settings on the “Configure URL” and press “Next >”.
8. Enter the Service-Now website you connect to as the Relying Party trust identifier. In this case use ‘https://companyname.service-now.com and click on “Add” and then click “Next >”.
9. Permit all users to access this relying party and select “Next >”.
10.Click “Next >” on the Ready to add page and uncheck “Open the Claims when this finishes” then close. You should now know see the Relying Party in the window.
11. Right click on the Relying Party trust and select “Properties”.
12. Browse to the “Endpoints tab” and add a “SAML Assertion Consumer” with a “Post” binding and a URL of https://companyname.service-now.com/navpage.do.
6. Do not select anything and click "Next>"
7. Do not enable any settings on the “Configure URL” and press “Next >”.
8. Enter the Service-Now website you connect to as the Relying Party trust identifier. In this case use ‘https://companyname.service-now.com and click on “Add” and then click “Next >”.
9. Permit all users to access this relying party and select “Next >”.
10.Click “Next >” on the Ready to add page and uncheck “Open the Claims when this finishes” then close. You should now know see the Relying Party in the window.
11. Right click on the Relying Party trust and select “Properties”.
12. Browse to the “Endpoints tab” and add a “SAML Assertion Consumer” with a “Post” binding and a URL of https://companyname.service-now.com/navpage.do.
AD FS Relying Party Claim Rules:
Now is the time to edit the Claim rules in order to enable proper communication with Service-Now.
1. Right click on the Relying Party and select “Edit Claim Rules…”
2. On the Issuance Transform Rules tab select “Add Rules…”
3. Select “Send LDAP Attribute as Claims” as the claim rule template to use and select “Next >”.
Give the Claim a name such as “Get LDAP Attributes”. Attribute Store should be set to “Active Directory” and LDAP Attribute should be “E-Mail-Addresses” and the Outgoing Claim Type should be NameID.
1. Right click on the Relying Party and select “Edit Claim Rules…”
2. On the Issuance Transform Rules tab select “Add Rules…”
3. Select “Send LDAP Attribute as Claims” as the claim rule template to use and select “Next >”.
Give the Claim a name such as “Get LDAP Attributes”. Attribute Store should be set to “Active Directory” and LDAP Attribute should be “E-Mail-Addresses” and the Outgoing Claim Type should be NameID.
4. Click finish and Apply and OK
Add User to Active Directory:
1. Click start and Select Active Directory Users and Computers
2. Navigate to Users tab and Right click-->New-->User
3. Input FirstName and LastName and UserLogon Name(kiran@sample.com)
4. Click Next and Input Password and Select Password never expires
5. Copy the user logon address
6. Click finish and Double click on User
7. Past the copied Logon email address in email field
8. Apply and Click ok
Create a user in ServiceNow Instance:
1. Log on to your ServiceNow instance
2. Application Navigation->Systems and Security->Click Users
3. Click on New button and Create a new user and Input email address copied earlier(kiran@sample.com)
4. Save
Testing:
1. Hit ADFS logon URL(https://your adfs domain/adfs/ls/idpinitiatedsignon.aspx)
2. Select your Relaying party and Proceed
3. Input ADFS user credentials and Proceed
4. You should be able to logon to ServiceNow
-------------------------------------------------------------------------------------------------------------------
In first post we have learned about collecting Federation Service Identifier and Export the “Token-Signing” certificate from microsoft's active directory federation server (adfs). In this post we will look at ServiceNow SAML 2.0 Settings
ServiceNow SAML 2.0 Settings:
1. Log into Service-Now with Admin privileges
2. Browse to “SAML 2 Single Sign On” and select Properties from application Navigator section
Note:
If SAML 2 is not listed, you will need to contact Service-Now from Hi portal to have it enabled

3. The correct settings for this example explain below
Identity Provider properties:
#The Identity Provider URL which will issue the SAML2 security token with user info.
We have to place Identity Provider URL which collected earlier. Please refer article 1
Example: http://domain/adfs/services/trust
#The base URL to the Identity Provider's AuthnRequest service. The AuthnRequest will be posted to this URL as the SAMLRequest parameter
We have to place The base URL to the Identity Provider's
Example: ht/tp://domain/adfs/services/trust/ls
#Sign AuthnRequest.
Leave default
#The base URL to the Identity Provider's SingleLogoutRequest service. The LogoutRequest will be posted to this URL as the SAMLRequest parameter
Based on the URL specified logout request will be redirected
Example:Idp login(https://domain/adfs/ls/idpinitiatedsignon.aspx)
#The protocol binding for the Identity Provider's SingleLogoutRequest service. (Value can be either "urn:oasis:names:tc:SAML:2.0:bindings:HTTP-Redirect" or "urn:oasis:names:tc:SAML:2.0:bindings:HTTP-POST".)
Leave default
#Sign LogoutRequest. Set this property to true if the Identity Provider's SingleLogoutRequest service requires signed LogoutRequest.
Leave default
#When SAML 2.0 single sign-on fails because the session is not authenticated, or this is the first login, redirect to this URL. This is the base URL where the initial SAML 2.0 AuthnRequest is sent using the SAMLRequest parameter
Leave default
#URL to redirect users after logout, typically back to the portal that enabled the SSO (e.g. http://portal.companya.com/logout)
Leave default
Service Provider (Service-Now) properties:
#The URL to the Service-now instance homepage.
This is Servicenow Login URL
Example:https://demo.service-now.com/navpage.do
#The entity identification, or the issuer
Example: https://demo.service-now.com
#The audience uri that accepts SAML2 token. (Normally, it is your instance URI
Example: https://demo.service-now.com
#The User table field to match with the Subject's NameID element in the SAMLResponse
This specifies the field in users table, that will be used to match the subject NameID in SAML assertion from Idp with ServiceNow user table
Example: email
#The NameID policy to use for returning the Subject's NameID in the SAMLResponse. Your SAML identity provider will have to support this by declaring the policy in its metadata. The NameID value is used to match with the specified field in the User table to lookup the user
Leave default
#Create an AuthnContextClass request in the AuthnRequest statement.
This tells the IdP that ServiceNow requires that they present a specific login mechanism such as a form, Kerberos, etc. If the AuthnRequest doesn't specify an AuthnContextClass, the IdP will choose the most appropriate method.
Check Yes
#The AuthnContextClassRef method that we will be included in our SAML 2.0 AuthnRequest to the Identity Provider
Leave Default
#The alias of key entry stored in SAML 2.0 SP Keystore used to sign SAML 2 requests.
Leave default
#The password of key entry stored in SAML 2.0 SP Keystore used to sign SAML 2 requests.
Leave default
#Click SAVE
Certificate Settings:
1. Select the “Certificate” page from the application navigation. At the top right corner,
2. Select the paper clip and attach the PEM certificate we created earlier.

Sometimes the certificate’s fields such as Issue and Subject do not populate after selecting save and there may be an error on the top of the page. If this is the case, open the saves PEM formatted certificate in notepad and copy and paste the certificate in the “PEM Certificate:” field followed by clicking on “Update”. This page should have all the areas filled out.
------------------------------------------------------------------------------------------------------
In next post, we will discuss about AD FS Relying Party Configuration and AD FS Relying Party Claim Rules

Service Provider:
A service provider (SP) is a company that provides organizations with enterprise class products like
ServiceNow, Salesforce, Netsuite,etc. Service can be storage, application, infra.
SP Initiated Single Sign On :
In this scenario a user attempts to access a protected resource directly on an SP Web site without being logged on
Technical Flow:
In this scenario a user attempts to access a protected resource directly on an SP Web site without being logged on. The user does not have an account on the SP site, but does have a federated account managed by a third-party IdP. The SP sends an authentication request to the IdP. Both the request and the returned SAML assertion are sent through the user’s browser via HTTP POST

1.The user requests access to a protected SP resource. The request is redirected to the federation server to handle authentication.
2.The federation server sends an HTML form back to the browser with a SAML request for authentication from the IdP. The HTML form is automatically posted to the IdP’s SSO service.
3.If the user is not already logged on to the IdP site or if re-authentication is required, the IdP asks for credentials (e.g., ID and password) and the user logs on.
4.Additional information about the user may be retrieved from the user data store for inclusion in the SAML response. (These attributes are predetermined as part of the federation agreement between the IdP and the SP—see About Attributes in the PingFederate Administrator’s Manual.)
5.The IdP’s SSO service returns an HTML form to the browser with a SAML response containing the authentication assertion and any additional attributes. The browser automatically posts the HTML form back to the SP.
NOTE:SAML specifications require that POST responses be digitally signed.
6.If the signature and assertion are valid, the SP establishes a session for the user and redirects the browser to the target resource.

Identity Provider
A system that creates, maintains, and manages identity information.
IdP (Identity Provider), is a system that creates, maintains, and manages identity information for principals (users, services, or systems) and provides principal authentication to other service providers (applications) within a federation or distributed network. It is a trusted third party that can be relied upon by users and servers when users and servers are establishing a dialog that must be authenticated. The IdP sends an attribute assertion containing trusted information about the user to the SP
IdP (Identity Provider), is a system that creates, maintains, and manages identity information for principals (users, services, or systems) and provides principal authentication to other service providers (applications) within a federation or distributed network. It is a trusted third party that can be relied upon by users and servers when users and servers are establishing a dialog that must be authenticated. The IdP sends an attribute assertion containing trusted information about the user to the SP
We are going to use Identity Provider Initiated SSO in later article. Means User will Login from Outside(IDp) and will be redirected to ServiceNow/Salesforce. Identity Provider must follow Federated Authentication (SAML) standard
SAML stands for “Security Assertion Markup Language” and it is Open standard for exchanging Authentication and Authorization between Systems. SAML based authentication is supported both
ServiceNow/Salesforce
Idp Initiated Single Sign On :
In IDp Initiated SSO, User Directly logins to Identity provider/Idp redirects user to proper ServiceNow/Salesforce Instance with SAML assertion in request (Service Provider). If SAML assertion is valid then Salesforce validates that user successfuly.
Technical Flow:
In this scenario, a user is logged on to the IdP and attempts to access a resource on a remote SP server. The SAML assertion is transported to the SP via HTTP POST.

Processing Steps:
- A user has logged on to the IdP.
- The user requests access to a protected SP resource. The user is not logged on to the SP site.
- Optionally, the IdP retrieves attributes from the user data store.
- The IdP’s SSO service returns an HTML form to the browser with a SAML response containing the authentication assertion and any additional attributes. The browser automatically posts the HTML form back to the SP.
- NOTE:SAML specifications require that POST responses be digitally signed.
- If the signature and assertion are valid, the SP establishes a session for the user and redirects the browser to the target resource.

Hello Friends,
In this series, We will be discussing about single sign on(SSO) and Types of SSO and We will discuss about underlying architecture.
Single Sign on(SSO):
Single Sign On (SSO) is a process that allow a user to access multiple services by logging in or authenticate only once. This involves authentication into all services the user has given permission to, after logging into a Identity provider(Ex: ADFS).The basic process of SSO is as follows:
- The first step is logging into the main service(Ex, Idp)
- The user requests access to a protected SP(Salesforce, ServiceNow, etc) resource
- Idp verifies user authorization with the help of attributes from the user data store
- Based on that Idp generate SAML response containing the authentication assertion and any additional attributes
- Based on SAML response, Idp will redirect you to the protected service provider
Advantages of SSO:
- No need to manage large numbers of passwords.
- A simpler sign-up and login process, which can also be good for conversions.
- Reduced exposure to the risks of data loss. Users already trust the identity provider
- etc

Single Sign-On access to ServiceNow the following configurations:
1. Configurations in the ServiceNow to accept secure communication from IdP.
2. Configurations in Identity Provider to accept communication from the ServiceNow.
Prerequisite:
- ServiceNow Instance
- SAML 2 Single sign on plugin
- Microsoft's active directory federation server (adfs)(Idp)
Navigation section

SSO Configuration with ADFS Involves in Following Steps:
- Get Federation Service Identifier
- ServiceNow SAML 2.0 Settings
- AD FS Relying Party Configuration
- AD FS Relying Party Claim Rules
- Testing the setup
Get Federation Service Identifier and Export the “Token-Signing” certificate:
Get Federation Service Identifier:
- Log into your ADFS 2.0 server and open the management console
- Right click on Service and choose Edit Federation Service Properties
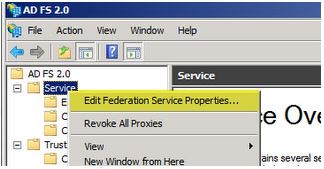
- Copy the Federation Service Identifier as that will be used to enter into the Service-Now SAML 2.0 configuration settings

Export the “Token-Signing” certificate:
1.Right click on Service and Double click on certificates
2.Double click on Token-signing from certificate section
3.Certificate wizard will open
4.Click on the “Details” tab
5.Click on “Copy to File…” The Certificate Export Wizard will launch. and Select “Next >”
6.Ensure “No, do not export the private key” is select and press “Next >”
7.Select “DER encoded binary X.509 (.cer)” and press “Next >”
8.Select where you want to save the file and give it a name and press “Next >”.
9.Finally, select “Finish”
Service-now requires that this certificate be in PEM format. You can convert this certificate using client tools or even online tools such as: SSL Shopper. Use the DER/Binary certificate we just created and export it to “Standard PEM” format.
SSL Shopper:
1.Login to https://www.sslshopper.com/ssl-converter.html
2.Choose DER encoded binary X.509 (.cer)

4.Select Standard PEM for Type To Convert To
5.Copy the PEM to Text editor
----------------------------------------------------------------------------------------------------------------
In next post will discuss about setting up ServiceNow SAML 2.0 Settings. Stay tune